My Sister Makes Beautiful Babies

Monday, June 25, 2012

My niece, Addison Lynn Roberts entered the world on Friday, June 22 at around 12:08pm.  She weighed in at 7lbs 11oz and 20 inches long.  My strong and amazing little sister went through 48 hours of labor and 2 hours of pushing all to end up having a C-Section.  Miss Addison was stuck and with each push her heart rate dropped a little.  They made the decision to get her out quickly via c-section to keep from stressing baby and momma out. 

I will have to say that my little niece is the most beautiful baby I have ever seen.  Everything about her is just perfect and I am loving each minute that I get to spend with her.  She is going to be so SPOILED! 


This little princess is a perfect combination of her mommy and daddy and I am excited to see her change month to month and year to year. 

Five things to know about Addi's Birthday:  June 22
1.  Nonie, Grandpa Eric, Nana P, Grandpa Wayne, and Aunt Jen, stayed up all night in the lobby awaiting her arrival.  We were running on fumes, but didn't want to miss a single minute.
2.  Great Aunt Lisa, Great Uncle Tony and Cousin Andrea left Lubbock at 1:30am on Friday morning and drove 6 hours to be at the hosptial for Addi's arrival.  They made it with 4.5 hours to spare. :)
3.  Addi gets to share her birthday with her Great Grandpa Pepaw!  She was born on his 78th birthday.
4.  Addi left the hospital on the hottest day of 2012, so far. :)  102 degrees
5.  Hospital food at Baylor Frisco is A-M-A-Z-I-N-G!


Welcome to the crazy, beautiful world Munchkin Addi!  Love you more than ice cream! :)

Pin It

I'm Back!

Thursday, April 26, 2012

Sorry about the long absence, but I'm back!  I spent the past month digging deep into my crafty side with planning a baby shower for my sister.  I had the most fun doing it too.  Here are some pictures of the things that I made and of the actual shower.  It was a great time for everyone who attended and Tif got lots of really nice gifts!!

Invitation for the Shower

Every girl needs a big bow (or 20)!  These colors are just so cute.

The glitter ribbon makes me smile!

My mom bought the red dress and I made the bow. :)
  

I love the photoshoots with babies in hats and diaper covers, so I found a pattern and made one.  I added some adjustments and I love how it came out!
  
Every girl needs a pair of cowgirl boots!
   
Centerpieces for the tables at shower.  These are made with cloth diapers and onesies. 
  
Food table at the shower.
 
Clothesline
 
Tables with decorations
  
I love the pillowcase dresses and I love blue and white fabric.  You can add any color you want and it looks so cute!
 
TuTu....Yes, please!
   
4-tiered diaper cake.  Some say it looks like a real cake and they couldn't wait to eat it!  :)
 
I love making these wreaths for the doors.  They are so easy and look fabulous.
  
Slip-cover made for Boppy pillow...So much cuter than the original one.


Pin It

Spring is Coming

Thursday, March 1, 2012

Whew!  I have lots of things in the works that I will be posting in the next couple of months, but for now let's talk Scentsy! :)

TODAY is the day...the day that the Spring and Summer 2012 catalogs roll out.  I am so excited about all of the new scents and ready to share them with everyone.  Cherry Limeade, Red Candy Apple, Honey 'Do, Simply Strawberry and Yuzu Dragon are just a few of my favorites. 

We have NEW solid perfume fragrances: Linger, Luna, Midnight Fig, Quiver and RU N2 Me....these things smell so awesome!  You can still get the Enchanted Mist, Love Story, My Wish, Satin Sheets and Simply Irresistible. 

Another new item for the Spring/Summer are the Mini Scentsy Buddies....Soooo cute!  Now you can have a mama buddy and a baby buddy. :)  Each buddy comes with one scent pak of your choice.


Now the really cool thing that Scentsy is releasing today......

Scensty Layers!!!


I have been excited about the Scentsy Layers since I began and now you can have your favorite Scentsy smell with you everywhere you go. :) 

Scentsy Layers includesShower Cream, Shower Gel, Body Lotion, Body Butter, Hand Cream, Body Spray, Washer Whiffs and Dryer Disks (or dryer sheets). 

You can get all of the layers (excluding Washer Whiffs and Dryer Disks) in these scents:  Coconut Lemongrass (reminds me of my Hawaiian Honeymoon!!), Enchanted Mist, Love Story, Luna, Quiver, and Sugar Cookie.  The Washer Whiffs and Dryer Disks are available in Coconut Lemongrass and Quiver

Now that you are excited about all of the new things....check out my Scentsy website (click the Scentsy logo) and let me know what I can order for you!


Pin It

Scentsy

Tuesday, February 7, 2012

I did it. I am now a Scentsy Independent Consultant. :) I am really excited to kick start this business and meet lots of great people in the process. You can click the Scentsy button and you will be taken to my Scentsy webpage. If you have any questions, please contact me and I will be happy to answer those.

Pin It

Chilled Banana Pudding

Monday, February 6, 2012


I wanted to share this yummy and easy banana pudding recipe with you all.  I have gotten many compliments after preparing this for the Superbowl last night. 


INGREDIENTS:
4 cups of Milk
1 can Eagle Brand Sweetened Milk
1 box Nilla Wafers
1 tub of Cool Whip
2 packages of 1.5 oz Jell-o Vanilla Pudding
6 bananas

DIRECTIONS:
  • Put packages of vanilla pudding in a bowl with the 4 cups of milk.  Mix well. 

  • Add the can of Eagle Brand Sweetened Milk and the tub of Cool Whip in with the pudding and milk mixture.

  • Make sure everything is mixed well, and place the bowl in the refrigerator for 30 minutes.

  • After the mixture has chilled, cut up the bananas and place them on the bottom of your serving dish. 

  • Put a layer of wafers on top of the bananas, followed by half of the chilled mixture.  Repeat with another layer of bananas, wafers and the remainder of the chilled mixture.


  • Finally, crumble the left over wafers and sprinkle the top of your pudding.  Place in the refrigerator for another 30 minutes or longer. 

OTHER NOTES: 
I let my banana pudding chill overnight, but it will taste just as wonderful the day of. 


CRITIC COMMENTS:
David-he loved it! 
Me-I thought it was really good, and I had to make myself only eat 1 helping.
Party guests-all loved it, one guy said, "Man this is GOOOOOOD!" when he didn't think anyone could hear. :)

Let me know how your banana pudding turns out!!

Pin It

It's Leap Year

Wednesday, February 1, 2012

According to an old Irish legend, St Bridget approached St. Patrick to protest on behalf of all women, the unfairness of always having to wait for men to propose marriage.  St. Patrick agreed to allow women to propose marriage once every 7 years, but St. Bridget wasn't satisfid.  She continuted to haggle and the deal was struck with women being able to propose to men every 4 years (specifically every Leap Year).  This is believed to have been introduced to balance the traditional roles of men and women in a similar way to how Leap Day balances the calendar.


If a man refuses the suitor's marriage proposal, he is expected to give her a kiss and a gown. 

In many European countries, especially in the upper classes of society, tradition dictates that any man who refuses a woman's proposal on February 29 has to buy her a pair of gloves. The intention is that the woman can wear the gloves to hide the embarrassment of not having an engagement ring.

Boy how times have changed.  :)

Pin It

Cheesy Chicken Roll Ups

Thursday, January 26, 2012


INGREDIENTS:
1 package (8oz) fat free cream cheese
1 package (6 count) crescent rolls
2 shredded cooked chicken breasts
1.5 cups of grated cheddar cheese
1 cup of grated Monterey Jack cheese
1 package of Hidden Valley Ranch Dip Mix
Salt
Pepper
Bread crumbs
Melted Butter

DIRECTIONS:
  • Boil the 2 chicken breasts (if frozen boil for approx 40 minutes, if thawed boil for approx 15 minutes). 
  • Mix the cream cheese, cheddar cheese, monterey jack cheese, salt, pepper and ranch dip mix into a bowl.  Set aside.
  • Pull your crescent rolls apart and lay them on your baking sheet.
  • Once the chicken is done, you will need to shred the chicken.  I added the chicken to my Kitchen Aid Mixer with the paddle attachment and it shredded the chicken in no time.
  • Add the cheese mixture to the chicken in your mixer and stir well.
  • Spoon the chicken and cheese mixture on each crescent roll and roll them up.  Make sure that you surround the entire mixture.
  • Brush some butter on the tops of the rolls and sprinkle them with bread crumbs.
  • Bake at 350 degrees for 20-25 minutes.

OTHER TIPS:
You can replace the butter and bread crumbs with cheese if you like. 
You can use any dip mix that you prefer or none at all.

CRITIC COMMENTS:
Me:  I am the only one who ate the roll ups because I had a sick husband and I really like them!  They are by no means healthy, but by using fat free cream cheese and skipping the butter it can help.  I did think they were really cheesy and I think I will try to cut some of the cheese out next time.  The best thing about this recipe is that you can really make it your own with the seasonings that you choose to use. 


Pin It

Gift Basket

Monday, January 16, 2012

We just finished up with wedding season and now we move quickly into baby season. :)  I have three people in my life that are due in the next 6 months, which means I have three shower gifts to purchase.  I don't really mind though, because I love babies and everything that comes with them.  (Disclaimer:  I currently do not have any babies. :) ) 

The first shower that I will be attending is for my best buddies Chrissi and Ryan.  They are making matters hard on me and not finding out the sex of Baby R.  I've tried several times to get her to have the doctor send me an envelope with the information, but it hasn't worked.  C&R are the people who love surprise and I know keeping the sex a secret is exactly what they wanted to do and they are having a blast with it.  I didn't want to get a typical gift off of the registry because C&R are close friends of mine, so I decided on doing a gift basket for them.  I did purchase a few small items off of their registry to add to the basket, but I also made the new baby something.  I think it is a way to show that I took time and really thought about C&R and their friendship to me and I wanted Baby R to be stylish!  I crocheted Baby R a red with black trim diaper cover with a matching red hat.  I added a flower to the hat, but this can be removed if Baby R is a boy. 

If you are interested in purchasing one of these,
please visit the contact tab and send me an e-mail. 

Here is the pattern that I used for the diaper cover from http://livingthecraftlife.blogspot.com/2011/08/newborn-diaper-cover-pattern.html:
I used a Size I-5.5 crochet hook instead of the Size H that is recommended on the website.

Pattern:
Chain 15
Row 1: Dc in 3rd ch from hk. Dc across. Turn. (13 dc)
Rows 2-9: Ch 3, Dc in each ch across. Turn. (13 dc)
Rows 10-13: Ch 3, 2 Dc in same ch, dc across, 3 dc in last ch. Turn.  (Row 12:25 sts)
Row 14-18: Ch 3, 1 Dc in same ch, dc across, 2 dc in last ch. Turn. (Row 18: 39 sts)
Row 19: Ch 7, sl st in 5th ch from hook to form loop, dc in same ch, dc across, 2 dc in last, ch 5, sl st with first ch of ch-5 to form loop. Turn.
Row 20: Ch 3, 1 dc in same ch, dc across, 7 dc in ch-5 loop.
This is where I changed the yarn color and sc around the entire diaper cover to form the black border.
After you have made it to the other ch-5 loop on the other side, 7 dc into the loop and fasten off.

I found that it was better to make the button holes on each side of the cover and attach 2 buttons (one on each side)


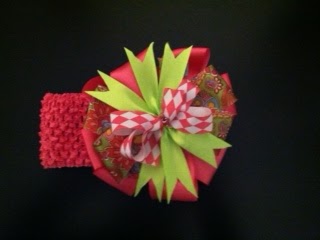
The nursery for Baby R is being done in red, black and white-so I took it and went with it.  I tried to add some clear paper to give it the feel of a gift basket, but the paper is too light for the bow that I made.  I had to get creative, but I really liked the bow and wanted it to be on the gift basket. 
Here is the final product:
Bring on the next baby gift :)


Pin It

Magnets

Wednesday, January 4, 2012

With the holiday season comes holiday cards, and I love to get the cards from all of our family and friends.  This year I wanted to display all of the cards on our refridgerator, but we didn't have any magnets.  I know, I know it's crazy, but I can't bring myself to spend very much on magnets.  So I decided to make some.

Supplies:
Makes approximately 60 magnets
  • 1 package of clear gems (you can get these in your floral section, be sure to get the large ones so you can see the paper)
  • Scrapbook Paper or Fabric
  • Mod Podge
  • Foam Brush
  • Scissors
  • Hot Glue Gun
  • Magnets (I got mine from Wal-Mart, but be sure you get a strong hold magnet or they won't be very effective)

1.  Place the gem on the paper and trace along the edge. Repeat this for the number of gems that you want.

2.  Cut the circles out a little smaller than the line you traced.

3.  Apply Mod Podge to the flat side of the gem and adhere the circle that you just cut out (make sure that the design is face down). Let dry.

4.  Apply Mod Podge to the back of the paper. Let dry.

5.  Apply magnet to the back of the gem with a hot glue gun. Let cool.

Ta-da! You now have cute homemade magnets to decorate your refridgerator.  :)


If you are interested in purchasing one of these,
please see the contact tab and send me an email.


Pin It

Happy New Year

Sunday, January 1, 2012

Happy New Year everyone! I hope everyone everyone had a great and safe New Year's Eve.  David, Sammy and I sat on our couch and rang in the New Year watching the ball drop. David isn't feeling well so we had a very lazy, yet relaxing day yesterday.  I hope he starts to feel better soon, it's kind of quiet around here. :(  We have a long weekend due to the holiday and I started my long weekend off with taking down all of our Christmas decorations.  It feels really nice to have our house back in order and all of the decorations in storage.  The weather was beautiful yesterday and I took Sammy for a walk around the block, he loves getting to go on walks and I will have to make it one of my New Year's resolutions to take him more.  Other resolutions that I plan to make, start eating healthy again, exercise at least 3 times a week (it's a start :)), and stress less! Wish me luck on these! :)

Hello 2012, let's make this another year to remember!!

Pin It
Related Posts Plugin for WordPress, Blogger...